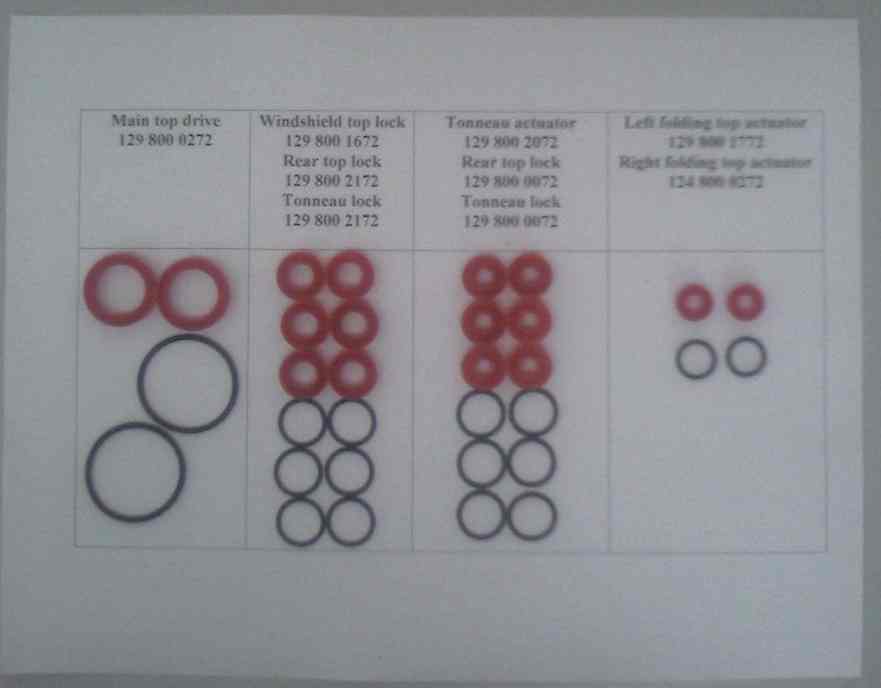
Seals for all 12 hydraulic cylinders
If the soft top of your beloved SL or SLK roadster or W124 or CLK Cabriolet is not working any more or is very slow, chances are that the hydraulic cylinders that operate the top are leaking. This is the main cause of failure of the soft top of these cars. The hydraulic seals inside the cylinders are made of material that is not very durable and degrade over the years in the mineral fluid independently whether you use the soft top a lot or do not use it at all. Some info says the seals are made of caprolactane (name of this material varies as flavors are patented under different names). The hydraulic seals usually simply disintegrate. No stop leak is able to fix the problem as sometimes sections of the seal crack away.
One solution is to replace all the cylinders with the new supplied by the dealer. The replacement cylinders probably use the same seals as the old ones. They are also pricey. All 12 replacement cylinders cost more than $3500 depending on your local dealer greed.
Another solution is to replace the seals. Seals made of polyurethane should be a much better option and should be much more durable and last much longer. A little problem however is that the seals are not a standard SAE or metric size. This is typical for Mercedes. Moreover, some seals have their cross-section smaller than the limit of modern machinery. Making molds is not an option as the molds are very costly, tens of thousands of dollars each. For a limited number of seals to be made it does not have any economical sense.
The seals on the picture are made in Europe on a very precise equipment used for military applications as well. Because the seal sizes mentioned above, machines are run beyond the limit which does not guarantee that the seals are made perfect on the first attempt. It took many tries to find the correct machine settings for some of the seals. It is still not easy, but we are here. Our first seals were made in 2008. No failures were reported as of now. So, we have more than 8 years experience of trouble free operation. The seals are available if you want to try and rebuild the hydraulic cylinders in your car by yourself.
Seals for all 12 hydraulic cylinders |
The following seals are available (part numbers are stamped on the cylinders):
R129 model (1990-2002, 300SL, 500SL, 600SL, SL280, SL320, SL500, SL600, SL55 AMG, SL70 AMG, SL73 AMG - lucky you)
Front locks: 129 800 1672 (2 each)
Main lifts: 129 800 0272 (2 each)
Rear bow: 129 800 1772/124 800 0272 (2 each)
Rear locks: 129 800 2172 or 129 800 0072 depending on the model year (4 each)
Tonneau cover lifts: 129 800 2072 (2 each)
A124 model (W124 cabriolet, 300CE, E320)
Main lifts: 124 800 0072 (2 each)
Tonneau cover lifts: 124 800 0372 (2 each)
Rear bow lifts: 129 800 1772/124 800 0272 (2 each)
Rear bow lock: 129 800 1672 (1 each)
Tonneau cover lock: 129 800 0072 (1 each)
W208 model (CLK200, CLK230, CLK270, CLK320, CLK350, CLK430, CLK500, CLK55 AMG, CLK63 AMG)
Rear bow lock: 129 800 1672 (1 each)
Tonneau cover lock: 129 800 0072 (1 each)
Other seals coming soon, please bug us.
R230 (all years, SL350, SL500, SL55 AMG, SL600, SL65 AMG)
Front lock: 230 800 0872 (1 each)
Frame locking cylinders: 230 800 0972/230 800 1072 (2 each)
Trunk lid drive: 230 800 1372 (1 each)
Load assist: 230 800 1472/230 800 1572 (2 each)
Others are coming soon.
R170/R171 (SLK 230, SLK230 Kompressor, SLK320, SLK 32AMG)
Front lock: 170 800 0072 (1 each)
Main drive: 170 800 0572/170 800 0672 (2 each)
Others are coming soon.
Rebuilding the cylinders is not that difficult. Some take only few minutes, like the cylinders above the windshield of the SL model, see the picture tutorial below. Some take a little longer and require some common garage tools and at least a vise with thick rubber or leather overgrips. In any case, getting the cylinder out usually takes 90% of the time.
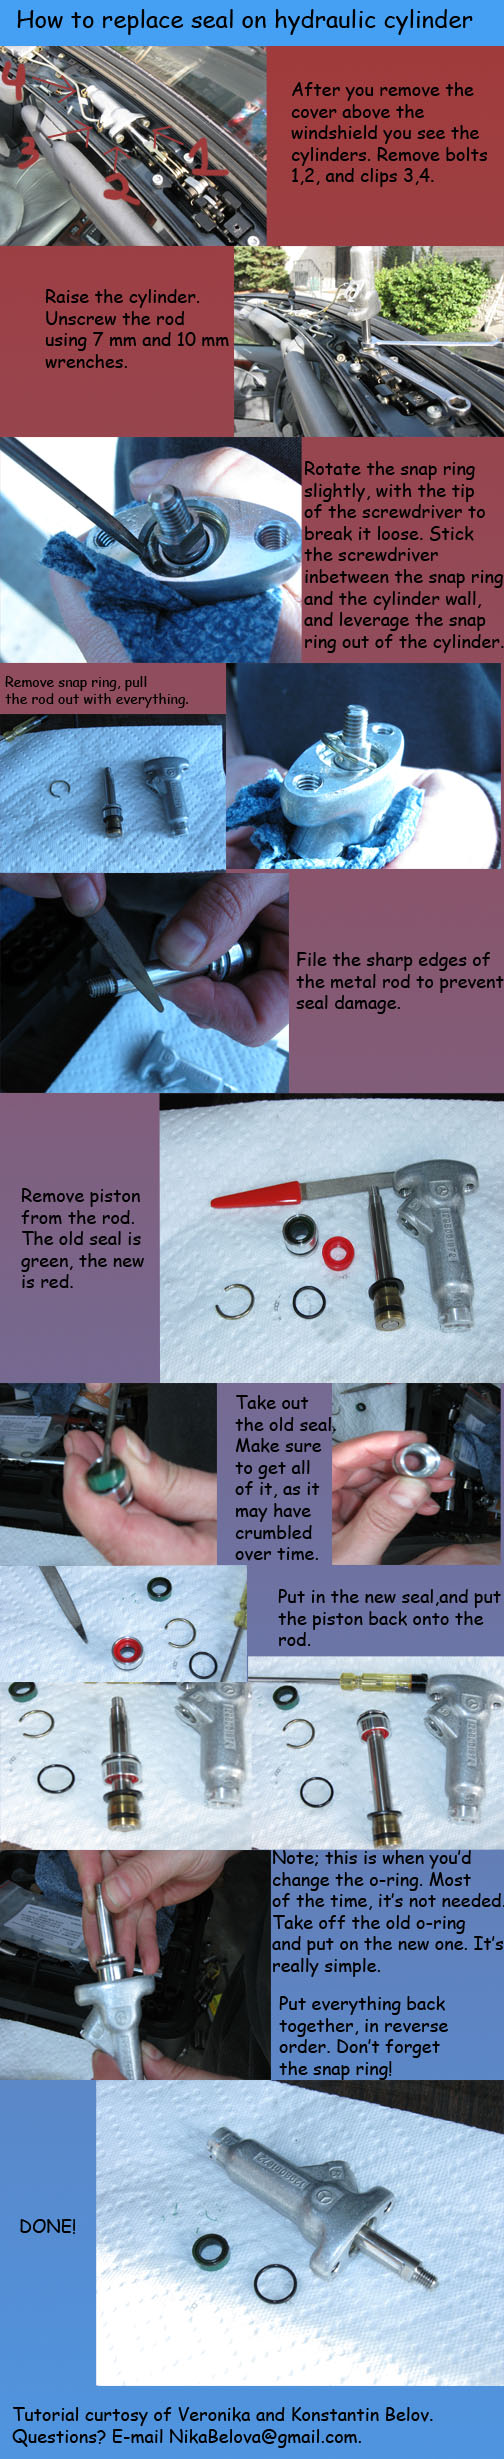 Above the windshield cylinders rebuilding. |
R129 soft top hydraulic cylinders R&R; with resealing instructions by D.Swanson. A124 are very similar.
A124 main cylinder rebuilding instructions. R129 model is very similar.
R129 cylinder removal and rebuilding instructions by mbseals.com.
A124 cylinders removal instructions by Timroperco. R129 model is the same.
Front locks removal and resealing video Video showing how to remove and reseal front lock cylinders of R129 model. Thanks to Craig Wilson who used my seals and created this video.
Discussion about material choice for the soft top hydraulic seals.
Rebuilt hydraulic cylinders and other parts I have for sale.
The seals are made in small quantities, but we always try to keep at least few of each size on hand. The seals very often shipped the same day your payment is received. However, we are not professional vendors and just trying to help the community. Please, understand if there is a slight delay. The price is $25.00 per seal kit for one cylinder. Minimum order is two kits. You can order the kits for any two cylinders. They do not have to be the same. Each kit contains a seal and a nitrile rubber (N70) o-ring if needed. The o-ring rarely goes bad and it is totally up to you if you want to replace it or not. The o-ring is nothing special and we simply include it in to our kit. If you want to rebuild all 12 cylinders of your R129 at the same time (not necessary, you can rebuild them one by one, two by two or in any other odd or even combinations you like) the cost of the whole set is $300.00. If you are ready, simply send you payment (see below). Please, do not forget to mention your name, shipping address and seals for which cylinders you are interested in. You can also send the info by email. The sizes are different!
Preferred payment methods:
Zelle to mbcylinders@gmail.com. In the notes put your shipping address and which seals you need. Most US banks have Zelle. You might need to activate it.
Paypal to mbcylinders@gmail.com. Please, use "gift" option only. All other orders will be refunded minus paypal fee!
Contact us by email for check and other payment methods or if you have any other questions.
In any case, please, do not forget to include your correct shipping address and tell me which seals you are up to. Also your car model year and VIN is very helpful. Please, read FAQ to determine the seal size for R129 rear bow and tonneau cover latches. Two different sizes available depending on the model year.
Good news! Euro is falling and we predict it will continue to fall. As of February 2012 We cut prices 20% to pass the savings on to our Benz owners. We do not aim to make a profit from this, just to cover our expenses.
We usually try to ship the same day as we know is sucks to have your soft top stuck closed when it is shiny or opened when it is raining, but since nobody helps us, please excuse us if your seals are not shipped the same day.
For questions or to arrange different forms of payment please email us.
Please, read FAQ.
Last updated Oct 2, 2023